Showing posts with label photography. Show all posts

Tuesday, August 23, 2011

Relevancy Decoded

Currently Etsy has switched to a relevancy based rank for searching items. As a seller you want to be coming to the closest to the top as possible...this forum posting really summarizes who you can do this for your shop...

WinchesterLambourne says
RELEVANCY tips and tricks: a compilation

There are so many questions about relevancy, so it is worth having all the answers and information compiled in one place. I have also added some observations of mine which I believe may be possible, after running some tests for the past few days.

1. The title is the most crucial and significant part of your listing.


2. The first few words of your title are the most significant part of this.


3. The top keyword needs to be first.

In other words, what you first type in the title makes the world of a difference in how relevant you are. The top keyword needs to be at the front of your listing title. If you're selling a nice pair of earrings with an amethyst gem, putting "Purple wonder" as the first words will ensure you won't be found in the first pages. Hardly anyone thinks of that word combination. If I (the buyer) am searching for amethyst earrings, I will search 'amethyst earrings' or 'amethyst earrings wire wrapped'. If I'm particularly choosy about what I put in my ears, I may search "amethyst earrings sterling silver". So your first keywords would be "amethyst earrings wire wrapped sterling silver". What kind of silver? I may like 'oxidized silver' and search for that. So, if they're oxidized, then 'amethyst earrings wire wrapped oxidized sterling silver'.

In the above example, the top keyword is 'amethyst earrings'. In my case, the top keyword is 'custom banner'. This is the most intuitive phrase or word(s) that the buyers use when searching.


4. Don't limit yourself to one type of intuitive top keyword or phrase.
Think about buyers who are different and search differently. For example, in my case the top keyword can be "custom banner". However, for what I do not all buyers use this particular one. Another top phrase is "shop banner" or "etsy banner". Having these variations in listings ensure that at least one will be seen for each type of search for the same or similar items.


5. Sometimes way you think is not how the buyer thinks.
This is something I struggled with for a while, when I started changing my listings. My first reaction was to either to stuff the title full of accurate keywords in a catch-all manner, disregarding order, or to use logical sounding sentences that were too long. Both can be mistakes. The first can be a mistake because order matters in relevancy - you don't only need to use accurate keywords, and as many of them as you can, but you need to place them in a certain order. I first had "custom personalized etsy banner and avatar package set'. They are good, relevant tags but the order is wrong. I was thinking from the seller's point of view there. Then I thought 'what will the buyer search?' They won't look for 'custom personalized etsy banner', because if they're like me when I search, they want to type in just the essential. I can be lazy when searching - I type in the absolute crucial because that's what gives the best results and well...because it's easy. I don't have a lot of patience. So I thought...'what would I type in if I were the buyer?' The crucial quick phrases 'banner avatar', 'basic set etsy' (not necessarily long grammatically correct sentences), and simple direct keywords 'etsy banner', 'banner and avatar', 'custom banner'. So to paraphrase in one tip&trick:

6. The gramatically incorrect word arrangements that we search with are just as important as the more logical sounding phrases we use in titles. When I started including these, I saw better results.


7. Tag order does not matter. This was stated by admin in a livestream meeting about relevancy back at the beginning of the month....however:


8. What IS crucial is for the master keyword of the title to match your first tag. It doesn't have to be your first tag, but putting it first ensures you won't forget this particular one because it is a very important tag. Example: If my listing is for a 'custom banner' and it begins with the master keyword 'custom banner' in the title, it makes considerable difference to have 'custom banner' in the keywords. Not just 'custom' and 'banner' but the exact phrase. It causes a significant push in relevancy.


9. Relevant, accurate tag phrases are now allowed. This is a recent move that came after relevancy. Examples from admin: 'knit hat', 'sterling silver'.


10. Recency matters. Listing an item pushes it up towards the beginning of the relevant search, however briefly. Which brings me to this hypothesis:


11. I could be completely wrong, but I believe that one factor which affects how high you rank is search clicks or your search rank. I've heard etsy admin mention it occasionally. There seems to be a limited 'grace period' immediately after relisting or renewing an item, when the item flickers around on page 1 or two, going back to the beginning of search, even if it is not the first item there. It's like it's trying to find it's place. Most often, I have found that the items I relisted were temporarily on page 1. Here it can go two ways. While it's at the forefront for those fleeting minutes or hours:

a) either it gets a lot of clicks while being fresh and in people's faces, because the photo is eyecatching and many decide to click it. Or:
b) it gets few or no clicks because there is no traffic, or traffic does not select your item to view and click on


If the item is towards the second third or more pages, route (a) seems to push the items gradually to the top and the first page, with the more clicks it gets. If it gets a lot of clicks, the item seems to be on the front page(s) a lot longer. It gets a more temporary and less fleeting exposure there (days possibly instead of minutes). If it's on page one, it moves up a little or lodges itself more strongly on page 1.

If the item is on the first page but gets little interest, it gradually sinks into 2, 3, 4 and so forth, with those items that get clicks staying on longer. Hence the constant shuffle between items that sink, items that come up, items that stay.

This tactic makes sense to me because it's similar to what other search engines use when they select relevant results, on the basis that people will want to see what people before clamored to see. I'm not sure if I'm right but this is one of my hypotheses.


12. This is why it remains important to renew occasionally (or better yet, relist) while constantly improving your photos.

Friday, May 20, 2011

5 Reasons To Watermark Your Etsy Images

Originally found on the Etsy Forums and then edited.

StudioEleven11 says
                                           
What is Watermarking?Watermarking is very common in the online digital world. Basically it's overlaying a small image on your finished product photo to either thwart piracy or build brand awareness. See photo below as an example. The watermark is my shop name and web address is the corner.


How Do I Watermark?.I recommend that you use Picasa and Picnik for all your photo editing needs. It's free and easy. Picasa's watermark does not get in the way the photo. It is small and on the lower right hand side of the photo. Here is the link that explains how to watermark Picasa pictures.
http://picasa.google.com/support/bin/answer.py?answer=106193  
Here is a tutorial about how to use picasa to edit your photos.
http://decoratingyourself.blogspot.com/#uds-search-results

Why should I watermark my images?
1. Branding
Etsy is photo driven and images are sometimes the first and only things people see. By adding watermarks to your images, you're putting the name of your shop front and center on Etsy search, your shop pages, and any featured stories on and off Etsy. And the more times people see your name, the more likely they are to remember it.


2. Google ImagesFor Etsy, your listing title becomes the keywords associated with your product images. This means that when someone does an image search on Google for "wire wrapped rings", your product images under this title have a good chance of being served. However, the images on Google don't link to your shop but the hosted versions of your image on Etsy. So, your images are basically giving Etsy more traffic. Leverage your images' visibility to your advantage and corral people back to your shop by watermarking your images.


3. PiratingWe all know it happens--people scraping or reusing your photos. But with watermarked images, at least you get some brand exposure out of the deal. Of course people can do editing magic and remove your watermark, but by definition scrapers are lazy and will most likely leave it, giving you additional exposure and making scraping work to your advantage.


4. CredibilityJust like a magazine ad with a designer's logo, your images are your "ads." Make them look finished and you as a designer more credible with watermarks.


5. Finished Product/Overall Shopper ExperienceLastly, give your product images a finished "edited" quality. Make them look intentional and fine tuned with a watermark. Watermarks will not fix bad photography but can augment beautiful photos with a well placed logo.

Wednesday, May 4, 2011

Confess ONE lesson learned & spare a newbie :)

This etsy forum thread currently has 195 pages of answers...this is impossible for the reader to wade through so...I am presenting an edited version with the "best of" comments and some comments of my own...

Original Post

I'm still a newbie, but I've learned from my mistakes on Etsy & never plan to repeat them. I have many new bad ideas to try. BUT let's each list ONE BAD IDEA that might spare some other newbies. Then explain WHY it's a dumb move. I don't mean Etsy Rule Violations -- Read my big dumb move & you'll see what I mean:

LESSON: DON'T post your products on Etsy at one time! ....
WHY: Shortly after you add an item to your store, ETSY shows pics of it on its home page for the top 2 (3?) 'tags' on that item. Example: Etsy will show my new listing for a bracelet in both its 'Jewelry' and 'Bracelet' home pages. This is a few minutes of priceless publicity that brings looks into your store, if a buyer clicks on those pics!

*****************************************************************************
I guess my lesson (and I'm still learning it, btw) is not to under price yourself. If it wasn't for me finally asking for help, and for a very kind seller pointing out specific examples from my store, I wouldn't have known. ....
*******************************************************************************
I had problems with shipping prices, too...I charged a buyer $3 to ship an item, the actual shipping ended up being almost $8!!! After shipping and fees, I barely broke even...but I learned my lesson!
*******************************************************************************
squrlgurl says
don't expect things to just "happen" on Etsy. You have to work hard to make sales... promote your work! Let people know you are here! You have to be a little shameless in these efforts
*******************************************************************************
I would have to say don't ask too many times to be critiqued, LOL I fell into that one and I think ended up with some people thinking I was begging for them to buy from me. Promoting is one thing, begging for a sale acts as a big negative!
ask the Sassy Team for a critique they are pros...   http://www.etsy.com/teams/search/sassy
****************************************************************************
SusyJack says
oh! I thought of something else. It is 100% worth it to learn how to use your digital camera to take great pictures. The reason for this is 2fold.

Firstly, it looks better to buyers (duh)
But second...many people who write blogs LOVE to put beautiful images in their blogs. If your pictures look good, then people will probably be more likely to feature your items in their blogs
great camera for $15, light cube free, photo editing free...
***************************************************************************
Proof read everything. :)
***************************************************************************
Put dimensions in your descriptions.
description check list... http://decoratingyourself.blogspot.com/2011/04/product-description-that-answers-buyers.html
******************************************************************************
beadsnall says
Create, beg, borrow or steal (OK, don't steal) a spreadsheet to keep track of your costs/profits - and keep it up to date. I now have a huge bag of receipts that I need to enter and I just can't bring myself to sit down and do it. Once it's done, I will (I promise) keep it current
******************************************************************************
Do not go on defense when your customer ask why they have not received their package..........
As sellers it is our job to help our customers not make them feel like they wish they had not spent their money with us.
If you know you sent it, explain to them nicely that it was sent on such date and you have no control after it is out of your hands.
Ignoring your customer do not help.
I say this because I have felt this way before and donot want my customers feel the way I did.
*****************************************************************************
Great thread, everyone!

My tip is to not be afraid to jump in and start doing it! I sorta psyched myself out before starting my shop (not this account), and I was surprised at how fun (and addictive!) it is. Oh, yeah! And stay positive- take things at your own pace, join the community, and enjoy the process of learning...
*****************************************************************************
Reyney says
Don't stare at the computer all day long. It will give you a headache.
***************************************************************************
One thing I noticed while I was reading this thread is that catchy avatars make me want to click on them and check out the store.
How to make avatars....http://decoratingyourself.blogspot.com/2011/03/conquering-phototext-editing-to-make.html
******************************************************************************
rheta says
Good tags are critical.
******************************************************************************
Join your local street team! You can meet fun people who share your interests. There are also specific craft-based street teams.
******************************************************************************
Don't listen to everybody in the forums, I kept changing everything to fit what others said was wrong, only to be stressing myself out. Didn't make much of a difference, now i do as what i think my shop needs. Every shop is different.
******************************************************************************
Well, the $7 you spend on a showcase spot might get you some nice numbers of views, but when you calculate the actual return on that spend, versus the 35 renews that you could do for the same amount of money, it just doesn't stack up. I did some showcases, and made 1 sale each time I did it. The profit margin was almost nil on those sales, after taking out the $7 showcase cost.
*******************************************************************************
Buy delivery confirmation. It's the best use of 19¢. When a buyer says they didn't get their package, you can track it...
*******************************************************************************
Get started on Google Analytics right away...
*******************************************************************************

I agree with the blog giveaways, thing, if you're going to do it, choose carefully. I did one that was basically $30 down the drain. On the other hand local giveaways (to charity events) have really paid off for me in off etsy sales
********************************************************************************
Write up your policy, etc...BEFORE YOU DO ANYTHING ELSE! That's really, really important for buyers to know you're serious and know the terms.
********************************************************************************

Don't let your shop sit idle. List something new as often as possible to stay at the top of the viewing order. Relist if you don't have anything new. Just keep popping up and you will be seen, eventually
********************************************************************************
Don't expect instant feedback for every sale.
********************************************************************************
If you don't like your shop name, change it sooner than later! I signed up on etsy as a buyer first and my username wasn't a very memorable shop name. I kept it as my store name for 3 months before finally opening up a new shop. I would have saved myself a lot of time and effort (and useless business cards) if I had just done it sooner!
********************************************************************************

I think my biggest blunder was not coming to the forums before I opened my shop! I could have learned a lot and avoided the mistakes....
*********************************************************************************
I mis-typed my paypal address, I didn't notice for ages because I was selling with no problems in my supplies shop, but when I sold some jewellery the payment didn't go through.
I, too, have done this.
**********************************************************************************

well when i started a whole 2 months ago i bought a whole lot of RECYCLED post paks. They are a recycled version of a padded bag. God knows why, i was just sending paper prints.

Anyway.... the recycled post paks turned out to pretty much DOUBLE my postage costs ( i just shouldered the cost) because the recycling material , being old newspaper or whatever it was that was inside it , weighed double that of the ordinary postpaks. Its unfortunate, because i would have liked to continue using recycled ones.
I also have made this mistake.
**********************************************************************************
momomatic says
I misplaced an item! I now put anything that I've taken a picture of for listing in a sealed tupperware bin so the two little kids in my house can't walk off with it.
This happened to me and spurred a total reorganization of my workspace.
**********************************************************************************
Don't get down on yourself, STAY POSITIVE!
Visit the get inspired page on this blog to regenerate your attitude.

Friday, March 25, 2011

Marketing -To Do List - When Sales Slow Down


What To Do When You Have Nothing To Do

1. Check Out Your Views, Hearts, Sales, Analytics


Analyze these and learn from them. Here's a list of questions to ask yourself: 
What items in my shop have the most views, hearts, sales?
What colors in my shop have the most views, hearts, sales?
What patterns in my shop have the most views, hearts, sales?
Is there a relation to a certain type of photo and high views, hearts, sales?
Where are my visitors coming from?
What keywords are they searching to find my shop?
What time of day and week day are they visiting the most on?
How long are they visiting my shop? 
How many pages in my shop to they visit?


Click on this post for how to get this information: Etsy Shop: Sales Stats, Daily Views Comparison, & Where are the Visitors Are Coming From

2. Redo Your Photos


Take this time to reshoot all your photos. Use natural light, plain backgrounds and test out different camera settings.  Or make a light box. All of these ideas a no cost or low cost. Click on the following blog posts for help in improving your photos.Etsy Shop: Sales Stats, Daily Views Comparison, & Where are the Visitors Are Coming From  and After the Right Camera...You Need the Right Lighting and Photos with Personality and The Final Touch: Photo Editing .


3. Tweak Your Descriptions

Have a peek at your convos.  What are your buyers frequently writing to you about? Sizes? Shipping details? Questions about customization?  For every buyer that contacts you there's probably a dozen out there that won't.  So make sure you are answering your buyers questions in your item descriptions and your shop profile and shop policies.  

Take this time to tell your story in your item descriptions and shop profile.  

4.  Double Check Tagging

Go through all your item listings and make sure you are using all 14 tags.  Make sure each listing has a tag that relates to color, size, style, motif or theme, texture and size. For vintage jewelry make sure you have these tags: jewellery (British spelling), team tags for treasuries, eco-friendly, ring size, vintage era (ie. 1950s, Victorian, Modern), solid (for solid gold), genuine (for genuine pearls). You can put as many words as will fit, separated by spaces and they are all searchable individually.
         5.  Start a Blog

Or create a few posts for a friends or Team blog.  Already do this?  Are you twittering?  Try something new and see if you like it.  Check out the twitter tutorial post. Entry Level Twitter


6. Have Fun
What have you wanted to do for a while, but haven't given yourself the go ahead?  Go and DO IT.  A long bike ride, a weekend trip, a new sewing project for yourself.  But wait. That's not it.   Take photos, blog or tweet about this.  Share it with your friends, family, fellow Etsy sellers, etc.  Plan on documenting this little adventure on flickr, twitter and your blog.  This will be a nice break not only for you  but for your readers and friends. 

This post was taken and heavily edited from https://docs.google.com/View?id=ddjtktcp_145fhnddzc4&pli=1.

Thursday, March 10, 2011

How to Make a Banner/Avi/Button Without a Fancy Program


This tutorial was inspired by HappCloudMoments tutorial on making a banner....but I found an easier, better way.

You need the Picasa 3 / Picnik programs and your product photos. Picasa3 (click on this to get free program for photo editing program)and with it comes Picnik (text editing program). If you use Etsy, you will need to make a banner and avatar for your store. If you are using eBay and Etsy you will need to make ad buttons and banners when you buy blog/web site ads. Banners for Etsy are 760 x 100 pixels. Avatars are 75 x 75 pixels. If  you buy an ad, the size will be stated when you buy the ad.

Step 1: Pick your photos. Just click on the ones you want. Ctrl-Click (Option-Click on Mac?) to select multiples.At this point you can also import your logo.  You will noticed that the ones you picked are stored in the tray in the lower left hand corner. If you are picking pictures from different directories, you have to "pin" them in the tray by clicking on the little green thumb tack. To unpin something, click on the picture you want to unpin and then the red circle button.
Step 2: Click on the Collage button in the bottom toolbar and once you are on the collage page click on 10.6 x 1/4 Real Banner. You can also set background color.
Step 3. In the left panel, select picture pile and make sure the draw shadows option is checked.
Step 4. Scale and arrange the pictures to fill collage. Just click on the image and it will pop up that gray circle with the little dot. You can rotate and scale using that.

Step 5: Click Create Collage.
Step 6:  Click on Picnik Icon.
Step 7: Click Edit to Resize. Unclick use percentages and unclick keep proportion. Type in 760 x 100 for banner (75x75 for avatar).
Step 8: Click Create to add Text. Choose font, color, size, etc. Click add.
Step 9: Pick a frame if you like. I have used drop shadow.
Step 10: Save to Picasa. Save to your computer picture file.
When you do the avatar add text and frames before you resize.


Tuesday, February 8, 2011

The Final Touch: Photo Editing

You have taken the photo of your piece of jewelry that has been well lighted and interestingly proped. Now you want to edit it and upload it to you listing. I have tried all kinds of editing programs....the winner is Piscasa..which is free see download    http://picasa.google.com/   piscasa also including PicNic for adding words to the photos. It is easy to use (but everything does have learning curve).

I used these eHow instructions to get me started:

How to Use Google's Picasa

Google Picasa is a free photo organizing and editing program that you can download from the Internet. With Picasa, you can also share your pictures with other people using various tools. You can fix red eye and adjust the colors in your photos. Read on to learn how to use Picasa.
Difficulty: Moderately Easy

Instructions

  1. Download the Picasa program from Google. Open up the program and let it search for photos on your computer. It will automatically sort them by date, but you can change their categorization if you want.
  2. Double-click the picture that you want to edit to get to the editing screen. From this screen, you can fix red eye, crop the picture and change color contrast and leveling. If you make a change you don't like, you can click the "Reset" button to undo the changes. In addition, you can click the "Cancel" button to exit without saving any of your changes. You can also right click on your picture and left click on "Undo all Edits" to get rid of the changes you made.
  3. Add some special effects if you like. You will have the option to change the tone of your picture to sepia. In addition, you can sharpen or soften the picture to create a slightly different appearance.
  4. Make a collage, pile, contact sheet or multi exposure with your pictures in Picasa. You can also choose black, white, gray or a picture for the background of these projects. If you create a collage that you like, click the "Create" button to save the changes.
  5. Share your photographs and collages in Picasa. You can email them, post them in your blog and create slideshows.
Later you will need to use this program to make shop banners and ads. It took me forever to find the right Picasa tutorial for this step....

Photos with Personality

You need to add some personality to your jewelry photos. You can use live models (but not for pierced earring because of the yuck factor on the part of the buyer). Know that you model pictures can be copied and end up anywhere on the net so leaving off faces is good for security. I use my daughter for necklaces and myself for bracelets and rings. I also have purchased some props on eBay for picture taking. I find antique dishes, wicker purse, geodes and jewelry display stands...(I got two used necklace display stands from a jewelry storefor a few $ on eBay)  http://shop.ebay.com/i.html?rt=nc&LH_ItemCondition=2&_nkw=necklace%20display%20stands&_fln=1&_ssov=1&_trksid=p3286.c0.m282

The most attractive and easiest is just a silver colored mat board you can buy from picture framer or art stores.


After the Right Camera...You Need the Right Lighting

You need light...more light that from the flash of your camera indoors. You can go outside and use natural light which works well and is free and can make for interesting back drops....but most of us need enhanced lighting. I use a photo cube with three lights that I go on eBay for $75. You can get a smaller version...but I photograph and sell more that just jewelry. I found them on eBay starting at $12...  http://photography.shop.ebay.com/i.html?_nkw=photo+cube+light+tent&_sacat=625&_sop=15&_odkw=photo+cube+light&_osacat=625&_trksid=p3286.c0.m270.l1313
 No money then DIY....

written by Jen Kiaba and can be found on her blog...
http://www.jenkiaba.com/2009/06/diy-lightbox-for-under-10.html


I used a 12" x12" x12" box, but let your subject needs define your size. If you are only photographing small earrings, then maybe you want to build a smaller one. However, if your subjects vary size wise, go larger and give yourself that nice range.

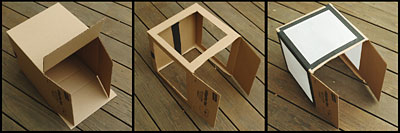
Basically we will cut windows in three sides of the box and totally take out one side. (That last part is optional - see below for why.) Tape the original bottom of the box securely into place before making your cuts, otherwise you will be left with a twisty cardboard mess. Leave two of the top flaps on for light control as shown, and remove the other two:

Photo by StrobistI used a razor to slice the boxes. Just a bit of advice: this is not a good project for when the kids are hovering around.

The last photo of the three-shot sequence shows the box with the tracing paper taped over the windows. You can choose to leave the "side" of the original box that will form the bottom of your studio attached to make it stronger, but it will preclude your ability to place the box down over an object (like a plant) outside and retain the surrounding ground environment. Your choice. :)

The thing could not be easier to use. You'll need at least one light source. A flash works great, as long as you can manually control the output and get it off of the camera. But you could also use a bright lamp or work light. Just be sure to balance your camera for tungsten and put the camera on a tripod to keep it still during the exposure.

For those of you who prefer shooting outside, this is the perfect tool for a sunny day! It will diffuse that strong light and make it absolutely perfect; to make the light come from whatever direction you need just rotate the box.

The beauty is the lighting control you get. You have the ability to almost completely wrap your subject in high quality light. But if you use only one light, the tissue paper acts as a fill reflector all around your subject. If you want to kill any reflected light on the darker side of your object just stick a square of black poster board on that side (on the inside.) Ditto on the top.

My favorite thing about this box is the "infinity sweep" effect you can get for a seamless bottom-to-background look. It's just a strip of posterboard. White and black (especially white) both work fine, but you could also use any color you wanted. You'll just have to pony up another 49 cents.

Need more lighting control? You got it. The two remaining flaps act as "gobo's" to block your camera from seeing the side light sources. No flare and very saturated colors- everyone wins. Simply adjust the flaps for best blocking effect. You want the light to come from closer to a 45-degree angle? Rotate the box around a little and shoot from closer to a corner. You want more definition on each side? Use a light source on each side.

When using two light sources, you can change the relative light intensity by dialing down one of the flashes on manual, or by moving one of your lamps further away or closer. Simple as that.

Tools of the Trade: The Right Camera

Will be adding tools to blog in order of priority....the camera is first...fabulous pics are 80% of the selling of vintage jewelry on line challenge...

The most important tool is your camera.. I use a Canon PowerShot SD750 Digital ELPH. Which bought NEW on Ebay. Be very careful about buying used on Ebay....first camera I bought didn't work and the seller won't give a refund and I had to go into a 3 month dispute to get a refund. This camera was about $125, but you don't need to spend alot. Just need great macro (close-up) capacity. My hubby and daughter got free (yes free) powershot cameras from applying for a Discover Credit Cards....look for this kind of special or.....you can pick one of the camera's reviewed below...
this article was taken from Etsy blog and written by
Jen Kiaba, a.k.a Jenkiabaphotography, is a self-proclaimed camera addict and seasoned photographer. I recently asked her a few questions to help you choose the right camera to shoot your product photos.
What kind of camera would you suggest for an Etsy seller who's just starting out, and has a limited budget?
If you're just starting out in the handmade world, probably the last thing you want to do is shell out a sizable pile of money for a camera. You know you need good photos, but will a more expensive camera really ensure that you get those great photos? The answer is "No." Promise! To prove this, I decided to give myself a little challenge and put several cameras to the test. The goal was to see if I could get great photos no matter what. At the moment I own three digital cameras (yes, I know — it's a sickness). These are all older cameras as well, to prove the point that you don't have to run to the mall and buy the newest camera on the market. A gently used camera is a great tool to begin with to learn the basics of photography! The first contender is a mid-level professional camera: a Canon 30D, which retails for about $800 online. This is the camera that I shoot all of my professional gigs with at the moment. It's a bit pricey for the Etsy seller just starting out, but I wanted to use this baby as a basis of comparison.
The second camera is a Fujifilm FinePix F30. With a little bit of online digging you can find this one for about $250. This is an amazing camera! If I could show up at all of my professional gigs with this camera and not get laughed out of town, I might try it. You have a full range of control with the exception of a true manual mode. There is a lot of bang for your buck here.
The last camera I tested today is a Nikon CoolPix L4. You can get this baby for $15 online! This camera came into my life when my sister moved to New York City and left it behind. Your exposure is fully automatic, but there seem to be all kinds of fun goodies to play with here.
Around 11 a.m. I found a window with some southern exposure, put a gauzy white sheet over the window to diffuse the light, and snapped some pictures of a vintage locket. I took two photos with each camera and then did a quick edit using Picnik.
The results:
The Fujifilm camera allowed me to get really close AND blur out my background by shooting in Aperture Priority mode and shooting with the widest aperture possible (in this case f2.8, which is really amazing!).
The Nikon doesn't give you that kind of fine-tuned aperture control because the exposure is fully automatic; however you could try mimicking that lovely blurred effect with Picnik's Focal Soften tool. The Macro setting also didn't allow me to get quite as close as the Fuji camera did, but the results were still pretty great!
Check out the image comparison and see for yourself. Which camera would you choose? The Fujifilm FinePix F30 is still my favorite, but I was pretty blown away by the Nikon CoolPix L4 as well. And for $15, you really can't go wrong!

Are there features that are more important than others they should look for?If you are in the market for a different model of camera, I would suggest looking for something with at least 4 megapixels (you don't need much more for Etsy or for printing up promotional materials), the ability to change your white balance, a macro mode and preferably an aperture priority mode. If you would like to read a great comparison of the top camera models for 2009, check out this post by Engadget Labs: The best point-and-shoot camera for under $400.
What kind of lighting would you suggest?
Natural lighting will always be your best friend. With a thin white sheet (or even a thin white vinyl shower curtain from the dollar store) and a window, you are in business. If your camera allows you to change your white balance to incandescent, this will give you the opportunity to shoot indoors in the evening if you don't get the opportunity to photograph using daylight. However you must make sure to have strong enough lights — inexpensive flood lamps work well in this case. Just make sure that they don't get too close to anything flammable.
If you aren't able to photograph during daylight hours, then it would also behoove you to look into making a photo lightbox. Here's a blog post I did last year: How to Make a DIY $10 Macro Light Tent!
Do you have any online resources you would suggest to a new photographer?
I highly recommend Digital Photography Tips for Beginners from Digital-photography-school.com.This site offers a whole series of articles dedicated to walking a new photographer through the basics in layman's language. The articles are so accessible and friendly, and I think new photographers will begin to enjoy taking photos for their shop once photography has been demystified for them!