
No money then DIY....
written by Jen Kiaba and can be found on her blog...
http://www.jenkiaba.com/2009/06/diy-lightbox-for-under-10.html
I used a 12" x12" x12" box, but let your subject needs define your size. If you are only photographing small earrings, then maybe you want to build a smaller one. However, if your subjects vary size wise, go larger and give yourself that nice range.
Basically we will cut windows in three sides of the box and totally take out one side. (That last part is optional - see below for why.) Tape the original bottom of the box securely into place before making your cuts, otherwise you will be left with a twisty cardboard mess. Leave two of the top flaps on for light control as shown, and remove the other two:
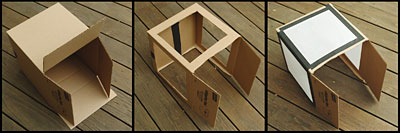 I used a razor to slice the boxes. Just a bit of advice: this is not a good project for when the kids are hovering around.
The last photo of the three-shot sequence shows the box with the tracing paper taped over the windows. You can choose to leave the "side" of the original box that will form the bottom of your studio attached to make it stronger, but it will preclude your ability to place the box down over an object (like a plant) outside and retain the surrounding ground environment. Your choice. :)
The thing could not be easier to use. You'll need at least one light source. A flash works great, as long as you can manually control the output and get it off of the camera. But you could also use a bright lamp or work light. Just be sure to balance your camera for tungsten and put the camera on a tripod to keep it still during the exposure.
For those of you who prefer shooting outside, this is the perfect tool for a sunny day! It will diffuse that strong light and make it absolutely perfect; to make the light come from whatever direction you need just rotate the box.
The beauty is the lighting control you get. You have the ability to almost completely wrap your subject in high quality light. But if you use only one light, the tissue paper acts as a fill reflector all around your subject. If you want to kill any reflected light on the darker side of your object just stick a square of black poster board on that side (on the inside.) Ditto on the top.
My favorite thing about this box is the "infinity sweep" effect you can get for a seamless bottom-to-background look. It's just a strip of posterboard. White and black (especially white) both work fine, but you could also use any color you wanted. You'll just have to pony up another 49 cents.
Need more lighting control? You got it. The two remaining flaps act as "gobo's" to block your camera from seeing the side light sources. No flare and very saturated colors- everyone wins. Simply adjust the flaps for best blocking effect. You want the light to come from closer to a 45-degree angle? Rotate the box around a little and shoot from closer to a corner. You want more definition on each side? Use a light source on each side.
When using two light sources, you can change the relative light intensity by dialing down one of the flashes on manual, or by moving one of your lamps further away or closer. Simple as that.
No comments:
Post a Comment